Module 1: Configure and secure demo application
Estimated time: 40 min
Learning objectives
- Deploy and configure demo application.
- Leverage network policies to segment connections within Kubernetes cluster (East-West) and prevent known bad actors from accessing the workloads.
- Configure fine-grained egress access (North-South) for specific workloads.
- Protect Kubernetes hosts ports using Calico policies.
Configure demo application
We will work with resources located in the tigera-eks-workshop repository that we cloned from Github. If you haven’t set the context to that directory yet, then navigate to it, i.e. cd ~/environment/tigera-eks-workshop.
Deploy policy tiers.
We are going to deploy some policies into policy tier to take advantage of hierarcical policy management.
kubectl apply -f demo/00-tiers/tiers.yamlThis will add tiers
securityandplatformto the Calico cluster.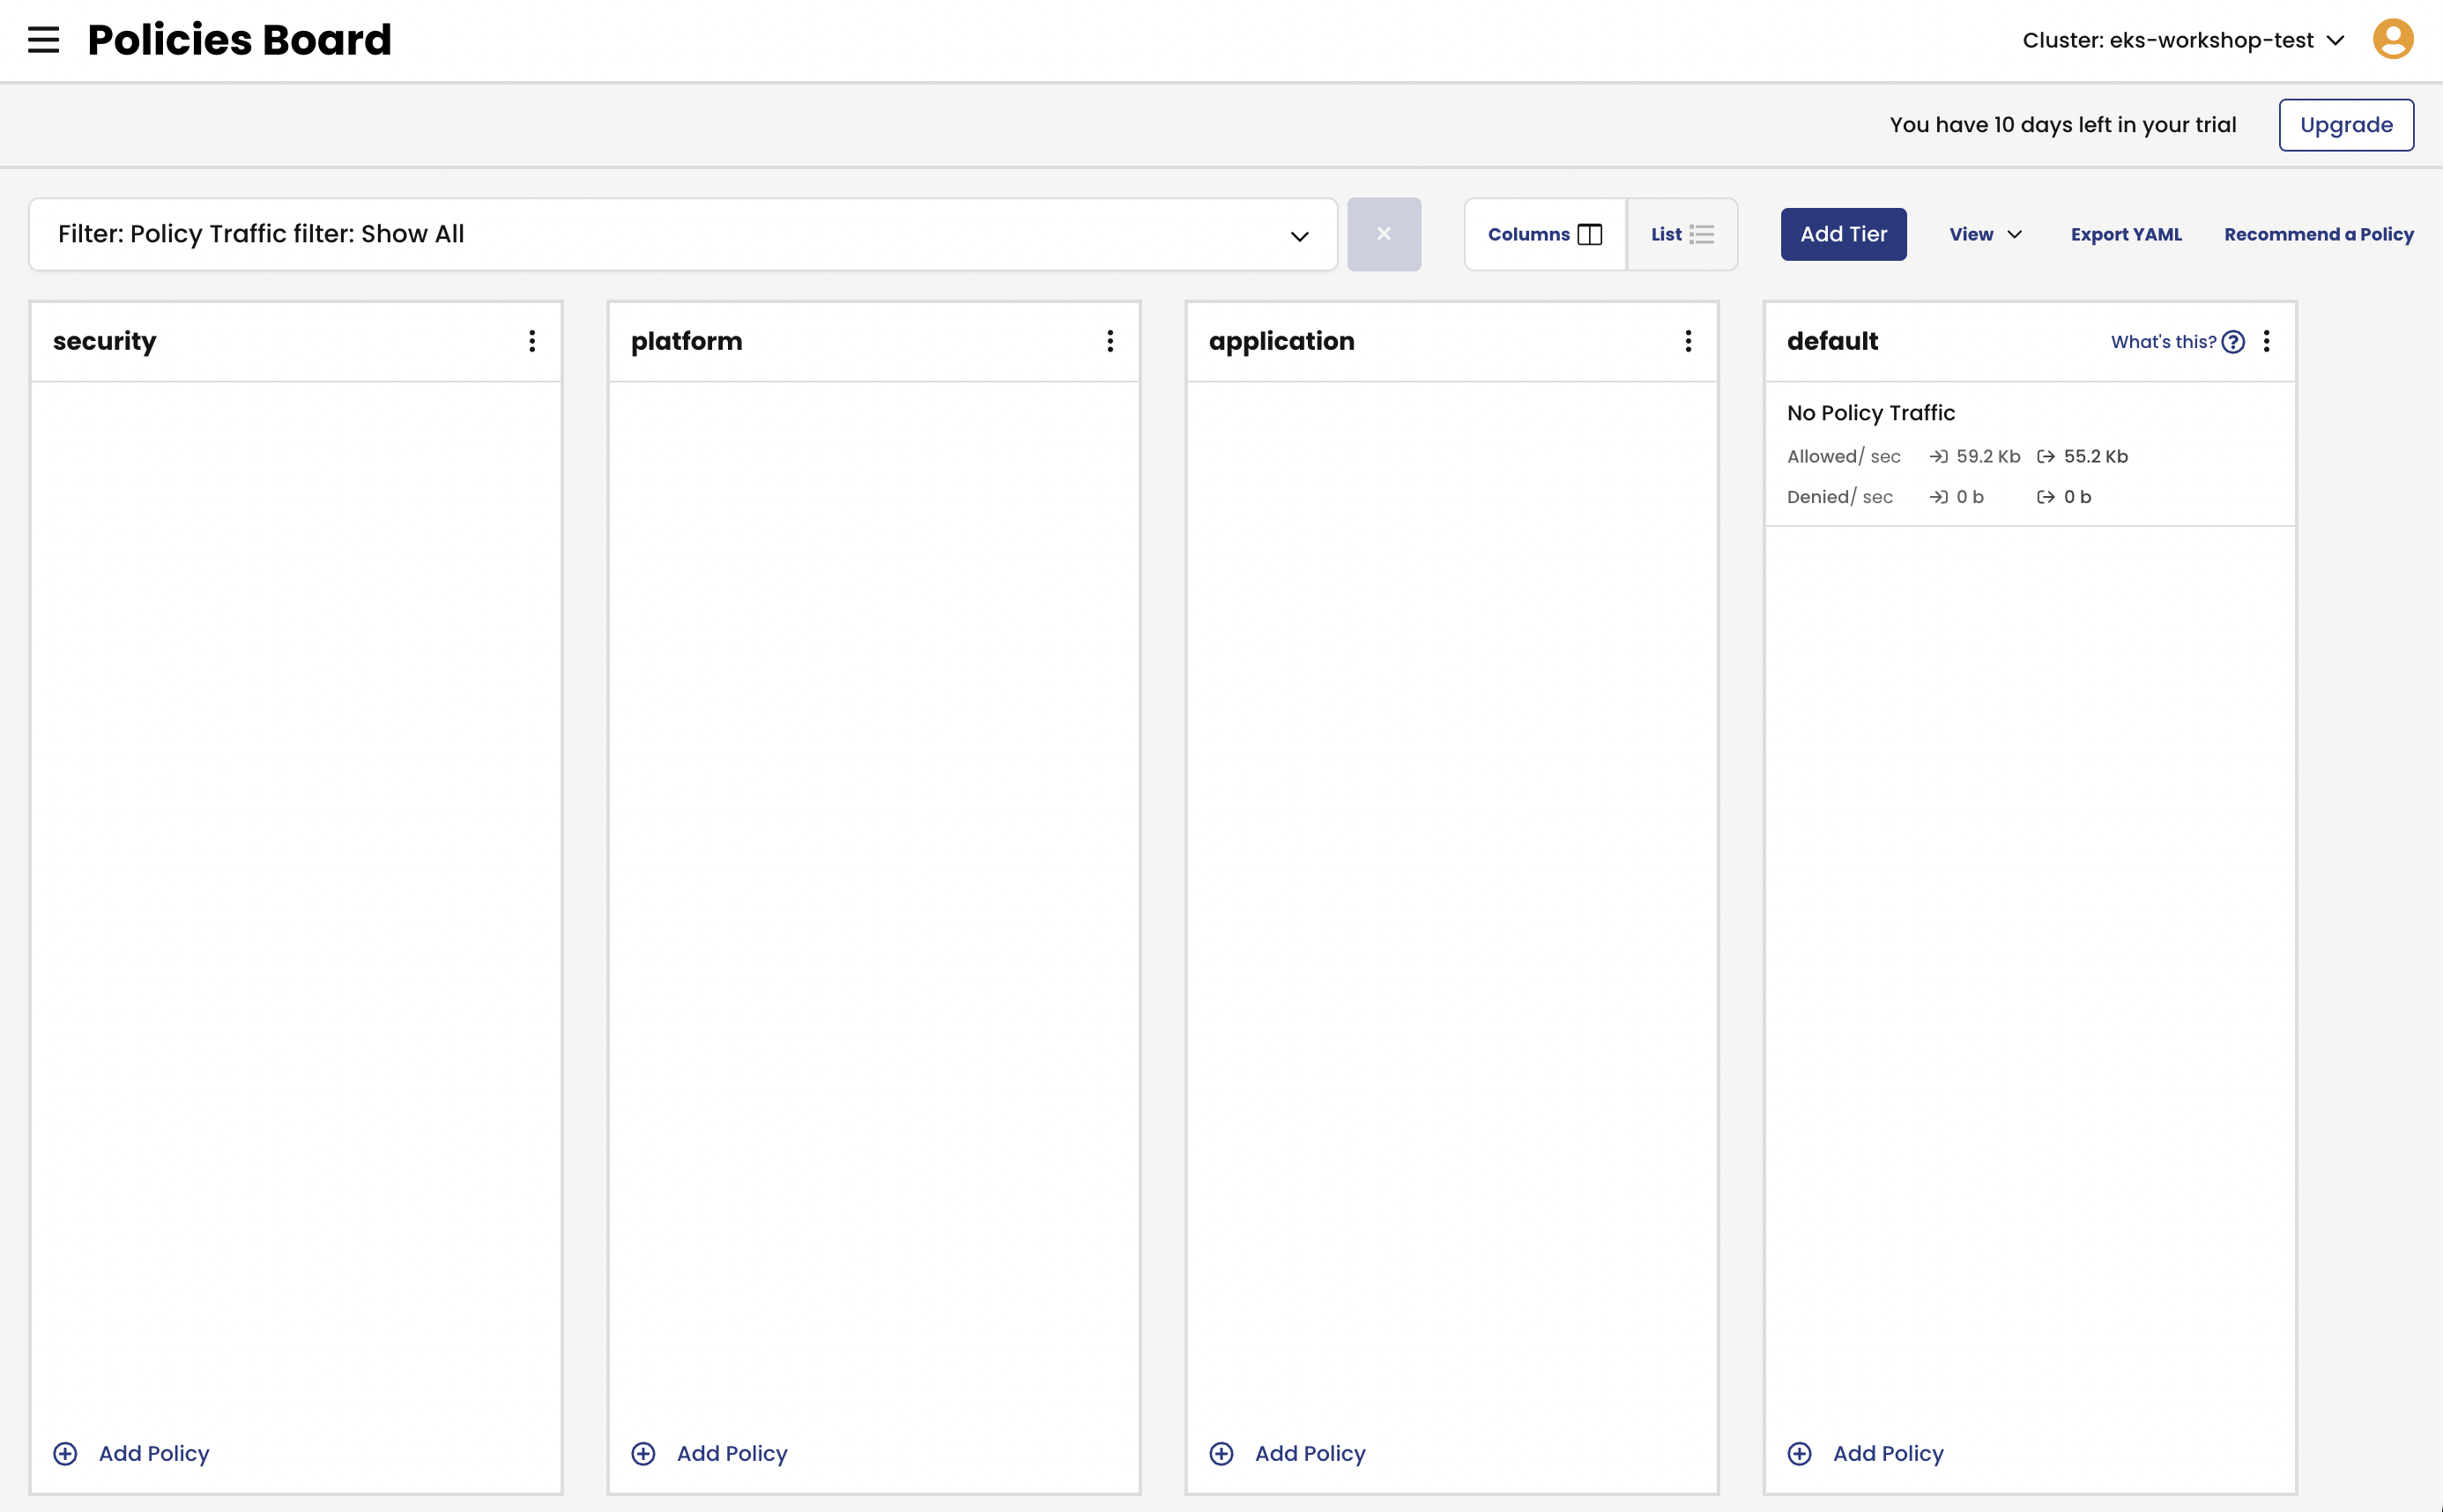
Deploy base policy.
In order to explicitly allow workloads to connect to the Kubernetes DNS component, we are going to implement a policy that controls such traffic.
kubectl apply -f demo/01-base/allow-kube-dns.yaml
kubectl apply -f demo/01-base/tiers-pass-policy.yaml
kubectl apply -f demo/01-base/quarantine-policy.yaml
Deploy demo applications.
# deploy dev app stack
kubectl apply -f demo/dev/app.manifests.yaml

# deploy boutiqueshop app stack
kubectl apply -f https://raw.githubusercontent.com/GoogleCloudPlatform/microservices-demo/release/v0.3.8/release/kubernetes-manifests.yaml
Deploy compliance reports.
The reports will be explored in a later lab.
kubectl apply -f demo/40-compliance-reports/daily-cis-results.yaml
kubectl apply -f demo/40-compliance-reports/cluster-reports.yaml
Deploy global alerts.
The alerts will be explored in a later lab.
kubectl apply -f demo/50-alerts/globalnetworkset.changed.yaml
kubectl apply -f demo/50-alerts/unsanctioned.dns.access.yaml
kubectl apply -f demo/50-alerts/unsanctioned.lateral.access.yaml
kubectl apply -f demo/50-alerts/boutiqueshop.unsanctioned.access.yaml
[Bonus task] Configure frontend service for L7 log data collection
This module is applicable to Calico Cloud or Calico Enterprise version v3.10+. If your Calico version is lower than v3.10.0, then skip this task. You can verify Calico version, by running command:
kubectl get clusterinformation default -ojsonpath='{.spec.cnxVersion}'L7 collector is based on the Envoy proxy which gets automatically deployed via
ApplicationLayerresource configuration. For more details, see Configure L7 logs documentation page.a. Deploy
ApplicationLayerresource.kubectl apply -f - <<EOF apiVersion: operator.tigera.io/v1 kind: ApplicationLayer metadata: name: tigera-secure spec: logCollection: collectLogs: Enabled logIntervalSeconds: 5 logRequestsPerInterval: -1 EOFThis creates
l7-log-collectordaemonset in thecalico-systemnamespace which containsenvoy-proxypod for application log collection and security.b. Enable L7 logs for the application service.
To opt a service into L7 log collection, you need to annotate the service with
projectcalico.org/l7-logging=trueannotation.# enable L7 logs for a few services of boutiqueshop app kubectl annotate svc frontend projectcalico.org/l7-logging=true kubectl annotate svc checkoutservice projectcalico.org/l7-logging=true
Segment connections within Kubernetes cluster
Add curl to loadgenerator component to run test commands.
This step is only needed if you’re using boutiqueshop app version in which the loadgenerator component doesn’t include curl or wget utility. Note, that package addition to a running pod will be removed as soon as the pod is restarted. You may need to add it back if loadgenerator pod restarts, and you still need to run curl commands to test use cases.
Install curl packages onto loadgenerator pod.
kubectl exec -it $(kubectl get po -l app=loadgenerator -ojsonpath='{.items[0].metadata.name}') -c main -- sh -c 'apt-get update && apt-get install -y curl iputils-ping && curl --help'Test connectivity between application components and across application stacks.
a. Test connectivity between workloads within each namespace.
# test connectivity within dev namespace
kubectl -n dev exec -t centos -- sh -c 'curl -m2 -sI http://nginx-svc 2>/dev/null | grep -i http'

# test connectivity within default namespace
kubectl exec -it $(kubectl get po -l app=loadgenerator -ojsonpath='{.items[0].metadata.name}') -c main -- sh -c 'curl -m2 -sI frontend 2>/dev/null | grep -i http'
b. Test connectivity across namespaces.
# test connectivity from dev namespace to default namespace
kubectl -n dev exec -t centos -- sh -c 'curl -m2 -sI http://frontend.default 2>/dev/null | grep -i http'

# test connectivity from default namespace to dev namespace
kubectl exec -it $(kubectl get po -l app=loadgenerator -ojsonpath='{.items[0].metadata.name}') -c main -- sh -c 'curl -m2 -sI http://nginx-svc.dev 2>/dev/null | grep -i http'
c. Test connectivity from each namespace to the Internet.
# test connectivity from dev namespace to the Internet
kubectl -n dev exec -t centos -- sh -c 'curl -m2 -sI http://www.google.com 2>/dev/null | grep -i http'

# test connectivity from default namespace to the Internet
kubectl exec -it $(kubectl get po -l app=loadgenerator -ojsonpath='{.items[0].metadata.name}') -c main -- sh -c 'curl -m2 -sI www.google.com 2>/dev/null | grep -i http'
All of these tests should succeed if there are no policies in place to govern the traffic for
devanddefaultnamespaces.Apply staged
default-denypolicy.Staged
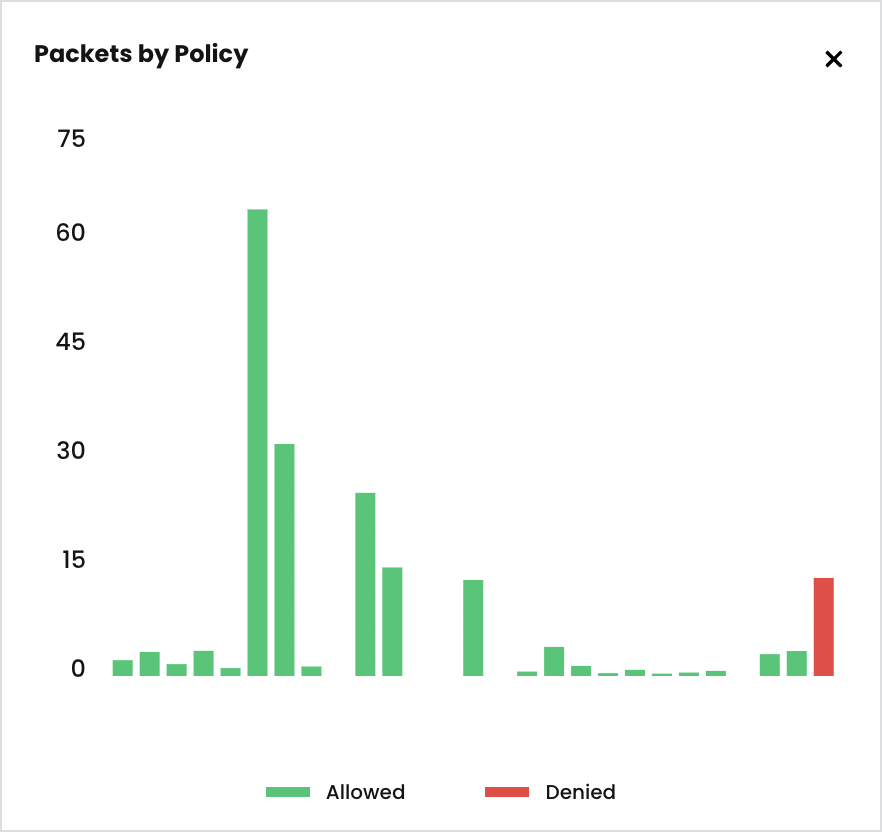
default-denypolicy is a good way of catching any traffic that is not explicitly allowed by a policy without explicitly blocking it.kubectl apply -f demo/10-security-controls/staged.default-deny.yamlYou should be able to view the potential affect of the staged
default-denypolicy if you navigate to theDashboardview in the Enterprise Manager UI and look at thePackets by Policyhistogram.# make a request across namespaces and view Packets by Policy histogram for i in {1..10}; do kubectl -n dev exec -t centos -- sh -c 'curl -m2 -sI http://frontend.default 2>/dev/null | grep -i http'; sleep 2; doneThe staged policy does not affect the traffic directly but allows you to view the policy impact if it were to be enforced.
Apply network policies to control East-West traffic.
# deploy dev policies
kubectl apply -f demo/dev/policies.yaml

# deploy boutiqueshop policies
kubectl apply -f demo/boutiqueshop/policies.yaml
Now that we have proper policies in place, we can enforce
default-denypolicy moving closer to zero-trust security configuration. You can either enforce the already deployed stageddefault-denypolicy using thePolicies Boardview in the Enterirpse Manager UI, or you can apply an enforcingdefault-denypolicy manifest.# apply enforcing default-deny policy manifest kubectl apply -f demo/10-security-controls/default-deny.yaml # you may remove staged default-deny at this point since we have enforced default-deny policy kubectl delete -f demo/10-security-controls/staged.default-deny.yamlTest connectivity with policies in place.
a. The only connections between the components within each namespaces should be allowed as configured by the policies.
# test connectivity within dev namespace
kubectl -n dev exec -t centos -- sh -c 'curl -m2 -sI http://nginx-svc 2>/dev/null | grep -i http'

# test connectivity within default namespace
kubectl exec -it $(kubectl get po -l app=loadgenerator -ojsonpath='{.items[0].metadata.name}') -c main -- sh -c 'curl -m2 -sI frontend 2>/dev/null | grep -i http'
b. The connections across
devanddefaultnamespaces should be blocked by the globaldefault-denypolicy.# test connectivity from dev namespace to default namespace kubectl -n dev exec -t centos -- sh -c 'curl -m2 -sI http://frontend.default 2>/dev/null | grep -i http' # test connectivity from default namespace to dev namespace kubectl exec -it $(kubectl get po -l app=loadgenerator -ojsonpath='{.items[0].metadata.name}') -c main -- sh -c 'curl -m2 -sI http://nginx-svc.dev 2>/dev/null | grep -i http'c. The connections to the Internet should be blocked by the configured policies.
# test connectivity from dev namespace to the Internet
kubectl -n dev exec -t centos -- sh -c 'curl -m2 -sI http://www.google.com 2>/dev/null | grep -i http'

# test connectivity from default namespace to the Internet
kubectl exec -it $(kubectl get po -l app=loadgenerator -ojsonpath='{.items[0].metadata.name}') -c main -- sh -c 'curl -m2 -sI www.google.com 2>/dev/null | grep -i http'
Protect workloads from known bad actors.
Calico offers
GlobalThreatfeedresource to prevent known bad actors from accessing Kubernetes pods.Calico offers other intrusion detection capabilities such as Honeypods, Anomaly Detection, and more which are outside of the scope of this workshop. Refer to Calico use cases for more details about Calico IDS capabilities.
Deploy the Feodo thread feed.
# deploy feodo tracker threatfeed
kubectl apply -f demo/10-security-controls/feodotracker.threatfeed.yaml
Test access to one of the IPs in the threat feed.
# try to ping any of the IPs in from the feodo tracker list
IP=$(kubectl get globalnetworkset threatfeed.feodo-tracker -ojson | jq .spec.nets[3] | sed -e 's/^"//' -e 's/"$//' -e 's/\/32//')
kubectl exec -it $(kubectl get po -l app=loadgenerator -ojsonpath='{.items[0].metadata.name}') -c main -- sh -c "ping -c1 $IP"
Configure a policy to block any attempts to connect to the endpoints from the threat feed.
# deploy network policy that uses the threadfeed
kubectl apply -f demo/10-security-controls/feodo-block-policy.yaml

# try to ping any of the IPs in from the feodo tracker list
IP=$(kubectl get globalnetworkset threatfeed.feodo-tracker -ojson | jq .spec.nets[3] | sed -e 's/^"//' -e 's/"$//' -e 's/\/32//')
kubectl exec -it $(kubectl get po -l app=loadgenerator -ojsonpath='{.items[0].metadata.name}') -c main -- sh -c "ping -c1 $IP"

# example using alienvault threatfeed in Calico Cloud
IP=$(kubectl get globalnetworksets -l feed=otx-ipthreatfeed -ojson | jq .items[0].spec.nets[0] | sed -e 's/^"//' -e 's/"$//' -e 's/\/32//')
kubectl -n dev exec -t centos -- sh -c "curl -S -m2 $IP 2>/dev/null"
Secure egress access for specific workloads
Test connectivity within the cluster and to the external endpoint.
a. Test connectivity between
dev/centospod anddefault/frontendpod.# test connectivity from dev namespace to default namespace kubectl -n dev exec -t centos -- sh -c 'curl -m2 -sI http://frontend.default 2>/dev/null | grep -i http'b. Test connectivity from
dev/centosto the external endpoints.# test connectivity from dev namespace to the Internet kubectl -n dev exec -t centos -- sh -c 'curl -m2 -skI https://api.twilio.com 2>/dev/null | grep -i http' kubectl -n dev exec -t centos -- sh -c 'curl -m2 -sI http://www.google.com 2>/dev/null | grep -i http'The access should be denied as the policies configured in previous module do not allow it.
Implement egress policy to allow egress access from a workload in one namespace, e.g.
dev/centos, to a service in another namespace, e.g.default/frontend.a. Deploy egress policy.
kubectl apply -f demo/20-egress-access-controls/centos-to-frontend.yamlb. Test connectivity between
dev/centospod anddefault/frontendservice.kubectl -n dev exec -t centos -- sh -c 'curl -m2 -sI http://frontend.default 2>/dev/null | grep -i http'The access should be allowed once the egress policy is in place.
Implement
DNS policyto allow the external endpoint access from a specific workload, e.g.dev/centos.a. Apply a policy to allow access to
api.twilio.comendpoint using DNS rule.# deploy dns policy kubectl apply -f demo/20-egress-access-controls/dns-policy.yaml # test egress access to api.twilio.com kubectl -n dev exec -t centos -- sh -c 'curl -m2 -skI https://api.twilio.com 2>/dev/null | grep -i http' # test egress access to www.google.com kubectl -n dev exec -t centos -- sh -c 'curl -m2 -skI https://www.google.com 2>/dev/null | grep -i http'Access to the
api.twilio.comendpoint should be allowed by the DNS policy but not to any other external endpoints likewww.google.comunless we modify the policy to include that domain name.Open
Policies Boardin the Manager UI and reviewallow-twilio-accesspolicy to see how DNS policy rule is configured.b. Edit the policy to use a
NetworkSetinstead of inline DNS rule.# deploy network set kubectl apply -f demo/20-egress-access-controls/netset.external-apis.yaml # deploy DNS policy using the network set kubectl apply -f demo/20-egress-access-controls/dns-policy.netset.yamlNavigate to
Network Setsview in the Manager UI and review deployed network setexternal-apis. Then navigate toPolicies Boardand view the changes in theallow-twilio-accesspolicy.As a bonus example, you can modify the
external-apisnetwork set to include*.google.comdomain name which would allow access to Google subdomains. If you do it, you would allow acess to subdomains likewww.google.com,docs.google.com, etc.
Secure Kubernetes host ports
This use case requires EKS hosts to have public IPs and a security group configured to allow access to port 30080. A cluster provisioned for an AWS hosted event is unlikely to be configured to allow direct node access over a public IP. In such case, you can review and skip this use case or try it out in your own EKS cluster.
Alternatively, you can configure EKS cluster security group to allow access from Cloud9 instance over port 30080, and then proceed with this use case.
Calico network policies not only can secure pod to pod communications but also can be applied to EKS hosts to protect host based services and ports. For more details refer to Protect Kubernetes nodes documentation.
Open a port of NodePort service for public access on EKS node.
For the demo purpose we are going to expose the
default/frontendservice via theNodePortservice type to open it for the public access.# expose the frontend service via the NodePort service type kubectl expose deployment frontend --type=NodePort --name=frontend-nodeport --overrides='{"apiVersion":"v1","spec":{"ports":[{"nodePort":30080,"port":80,"targetPort":8080}]}}' # open access to the port in AWS security group CLUSTER_NAME='tigera-workshop' # use 'basic-eks' for AWS hosted event AWS_REGION=$(curl -s 169.254.169.254/latest/dynamic/instance-identity/document | jq -r '.region') # pick one EKS node and use it's ID to get securigy group SG_ID=$(aws ec2 describe-instances --region $AWS_REGION --filters "Name=tag:Name,Values=$CLUSTER_NAME*" "Name=instance-state-name,Values=running" --query 'Reservations[0].Instances[*].NetworkInterfaces[0].Groups[0].GroupId' --output text --output text) # open SSH port in the security group for public access aws ec2 authorize-security-group-ingress --region $AWS_REGION --group-id $SG_ID --protocol tcp --port 30080 --cidr 0.0.0.0/0 # get public IP of an EKS node EKS_NODE_PUB_IP=$(aws ec2 describe-instances --region $AWS_REGION --filters "Name=tag:Name,Values=$CLUSTER_NAME*" "Name=instance-state-name,Values=running" --query 'Reservations[0].Instances[0].PublicIpAddress' --output text --output text) # print for easy copy/paste echo "EKS_NODE_PUB_IP=$EKS_NODE_PUB_IP" # test connection to SSH port nc -zv $EKS_NODE_PUB_IP 30080It can take a moment for the node port to become accessible.
If the SSH port was configured correctly, the
nccommand should show you that the port is open.Enable
HostEndpointauto-creation for EKS cluster.When working with managed Kubernetes services, such as EKS, we recommend using
HostEndpoint(HEP) auto-creation feature which allows you to automate the management ofHostEndpointresources for managed Kubernetes clusters whenever the cluster is scaled.Before you enable HEP auto-creation feature, make sure there are no
HostEndpointresources manually defined for your cluster:kubectl get hostendpoints.# check whether auto-creation for HEPs is enabled. Default: Disabled kubectl get kubecontrollersconfiguration.p default -ojsonpath='{.status.runningConfig.controllers.node.hostEndpoint.autoCreate}' # enable HEP auto-creation kubectl patch kubecontrollersconfiguration.p default -p '{"spec": {"controllers": {"node": {"hostEndpoint": {"autoCreate": "Enabled"}}}}}' # verify that each node got a HostEndpoint resource created kubectl get hostendpointsImplement a Calico policy to control access to the service of NodePort type.
Deploy a policy that only allows access to the node port from the Cloud9 instance.
# from your local shell test connection to the node port, i.e. 30080, using netcat or telnet or other connectivity testing tool
EKS_NODE_PUB_IP=XX.XX.XX.XX
nc -zv $EKS_NODE_PUB_IP 30080

# get public IP of Cloud9 instance in the Cloud9 shell
CLOUD9_IP=$(curl -s http://169.254.169.254/latest/meta-data/public-ipv4)
# deploy HEP policy
sed -e "s/\${CLOUD9_IP}/${CLOUD9_IP}\/32/g" demo/30-secure-hep/frontend-nodeport-access.yaml | kubectl apply -f -
# test access from Cloud9 shell
nc -zv $EKS_NODE_PUB_IP 30080
Once the policy is implemented, you should not be able to access the node port
30080from your local shell, but you should be able to access it from the Cloud9 shell.Note that in order to control access to the NodePort service, you need to enable
preDNATandapplyOnForwardpolicy settings.[Bonus task] Implement a Calico policy to control access to the SSH port on EKS hosts.
This task requires access to EKS hosts over SSH port (22). Skip this task if your cluster configuration does not allow access to SSH port on the EKS hosts.
When dealing with SSH and platform required ports, Calico provides a failsafe mechanism to manage such ports so that you don’t lock yourself out of the node by accident. Once you configure and test host targeting policy, you can selectively disable failsafe ports.
# deploy FelixConfiguration to disable fail safe for SSH port
kubectl apply -f demo/30-secure-hep/felixconfiguration.yaml

# get public IP of Cloud9 instance
CLOUD9_IP=$(curl -s http://169.254.169.254/latest/meta-data/public-ipv4)
# allow SSH access to EKS nodes only from the Cloud9 instance
sed -e "s/\${CLOUD9_IP}/${CLOUD9_IP}\/32/g" demo/30-secure-hep/ssh-access.yaml | kubectl apply -f -